How to use Dynamic Regions to Mitigate Dynamic, Interactive or Randomized Content

Today I'm happy to announce another new video in our series of video tutorials about the WebsiteUpgradeTester.com visual testing tool.
This just published video tutorial shows how to use Dynamic Regions to mitigate out dynamic, interactive or randomized content that may cause false differences when testing your website upgrade.
What does this mean? It means that if your site has any dynamic, interactive or randomized content, you want to set up simple rules in the tool to ignore content of this type. We do this so when the tool compares the pre-upgrade version with a post-upgrade version of a page, this region is ignored so that it does not flag the page as being different.
Watch this short video and you'll see how quick and easy it is to mitigate your dynamic, interactive or randomized content.
Video Transcript
Welcome to Website Upgrade Tester.com, the new cloud-based tool helps you test any upgrade, service pack or security patch to your website.
In this video, I'm going to walk you through mitigating dynamic, interactive or randomized content using Dynamic Regions.
Dynamic Regions Explained
Dynamic Regions are one of several ways to mitigate out dynamic, interactive or randomized content so that it does not produce false positive differences in your results.
What does that mean?
Let's take a look.
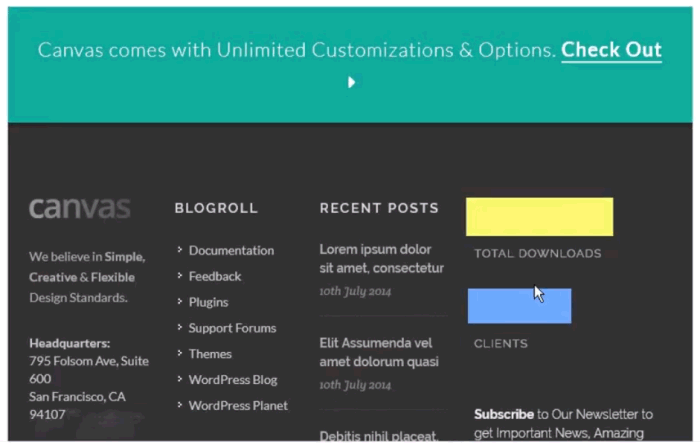
If I open up one of the pages in our Canvas demo site you can see that it has two interactive counters in the footer of the page. These counters cause this page and many others that use this same footer, to be different because the counter is at a slightly different count when the screenshot is taken.

Here you can see this by looking at the side-by-side comparison of the page or using the splitter view.
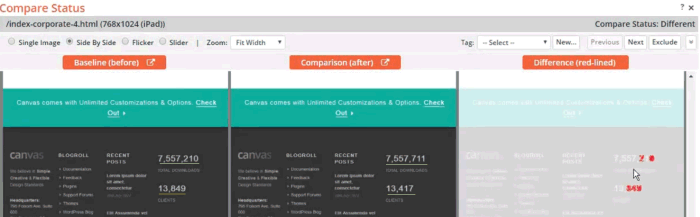
Notice that all other content is the same, just the counter causes the page to be different.
And, because this footer is rendered on many pages, it will throw the results off, making it harder to see what differences are truly caused by the upgrade.
To mitigate this type of interactive content, I can use Dynamic Regions to remove, replace or 'white-out' that region.
Comparison of Dynamic Region Types
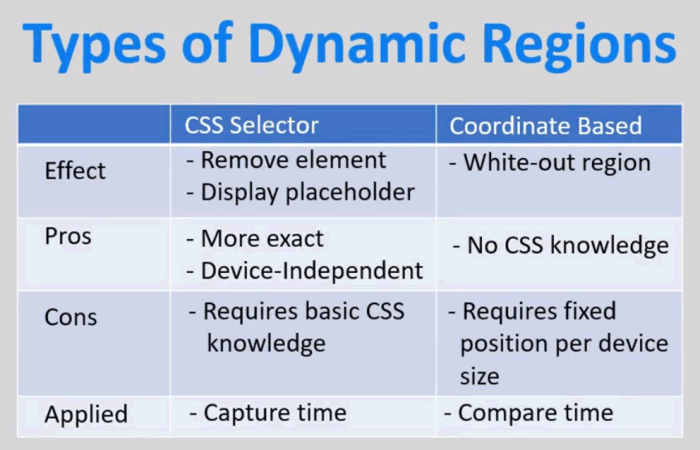
In general, there are two kinds of Dynamic Regions: CSS Selector-based and Coordinate-based.
Each has its own pros and cons.
The first kind specifies a CSS selector, that targets a specific region of your page and either removes that element or displays a fixed sized placeholder in its place.
So for example, if your page outputs the current date or time you would simply create a Dynamic Region that specifies the CSS ID or class of the element to remove it.
The second type, Coordinate-based Dynamic Regions, allows you to specify rectangular coordinates on the page to 'white-out' that region, by drawing a rectangle over the specified area.
The CSS selector method is more exact and is device-size independent. However, some basic knowledge of HTML and CSS is required. Also, any CSS Selector-based Dynamic Regions get applied just before the screenshot capture, so their results are stored in the snapshot images.
The coordinate-based approach requires no CSS knowledge, but it assumes that the content will always be in the same location on the page, for that device size, which might not always be the case. Coordinate-based dynamic regions are NOT stored with the snapshot image. They are instead applied as part of the comparison, so they have the advantage of not having to re-run the captures.
Let's see an example of creating each type.
CSS Selector-based Example
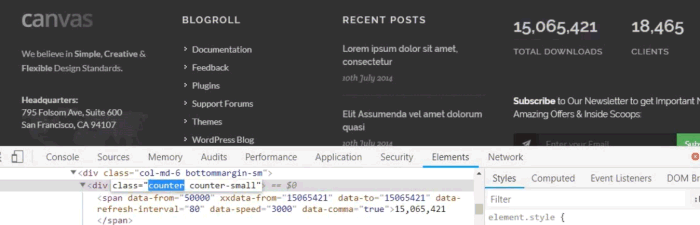
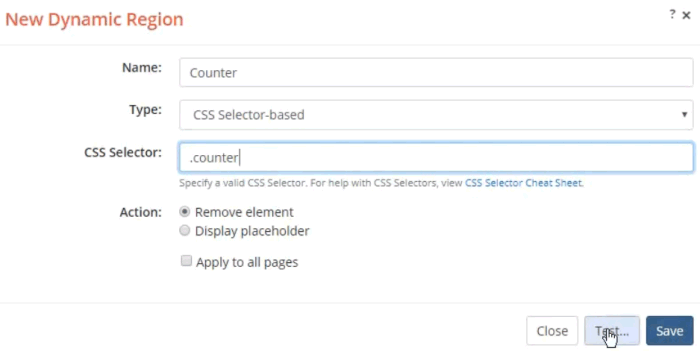
To create a CSS Selector-based dynamic region that mitigates the two counters in the footer, we need to find a unique CSS selector that applies to each element.
To do this, inspect the element by right mouse clicking on one of the counters and choose Inspect.
Looking at the code, we can see a parent <div> with a class of 'counter'. Let's use that to identify the elements.
You can add and manage Dynamic Regions from several places. The most straightforward way is to click the edit icon for a specific page.
From here you can select or create a new Dynamic Region, under the Dynamic Regions Tab.
Let's add one now to remove these counters.
I'll simply click the Dynamic Regions tab, and then the Add Dynamic Region button.
Here we simply give the Dynamic Region a name, and in this case, keep the type as CSS Selector, and then specify the selector. We'll also choose to remove the element fully.
Ok there.
Now we can test the Dynamic Region by clicking the 'Test' button. And then choosing a screen size to test.
As you can see, the two counters are now gone. The dynamic region worked.


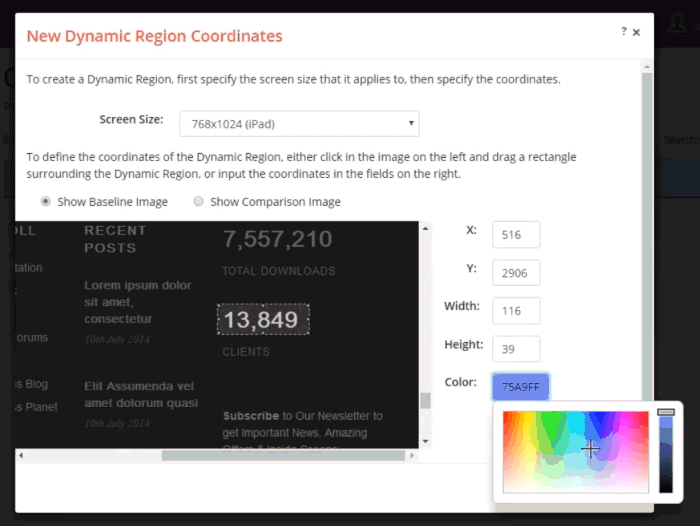
Coordinate-based Example
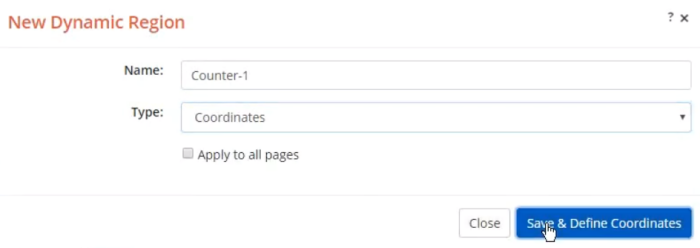
Lastly, let's create a Dynamic Region using coordinates.
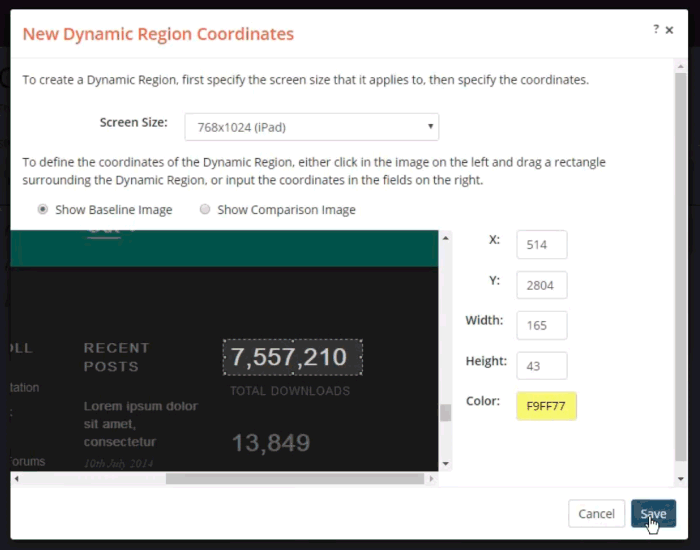
Remember that this approach can only be used if the dynamic region appears in exactly the same position from page to page. And you may need to create different dynamic regions for each screen size.
To create a Coordinate-Based dynamic region, choose 'Coordinate-based' from the selection list, then click 'Save and Define Coordinates'
This will then show the snapshot image of the page where you can simply drag out the rectangular region to white it out.
Ok. Great that one is saved.
We have two regions that we need to white out. Let me do the other one quickly.
I'll click new, give it a name, choose coordinates for the type, and will click the Save & Define Coordinate one more time.
I'll pick the same screen size.
Will highlight the second counter number, and this time I'll choose a blue color.
Ok, I'm done. Let's save this off.
I'll click the 'Test' button to try it out.
This will take a few seconds. Here we go. Let me scroll to the bottom.
And Yes, you can see this worked as well.
Note that because the coordinate-based approach simply draws a rectangle over the coordinates specified, you do not have to regenerate either the baseline nor comparison screenshot to apply the Dynamic Region. This can be extremely useful if upgrading in place.
Apply to All, or Selected Pages
Now that you have created one or more Dynamic Regions, you can apply them to All Pages, a selected Subset, or just a single page.
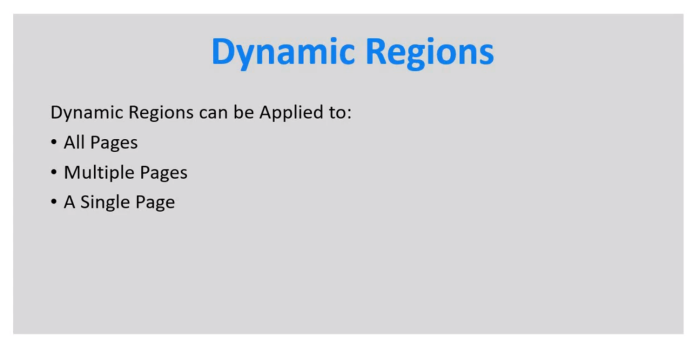
To Apply to All pages, simply check the 'Apply to All Pages' checkbox went creating the Dynamic Region.
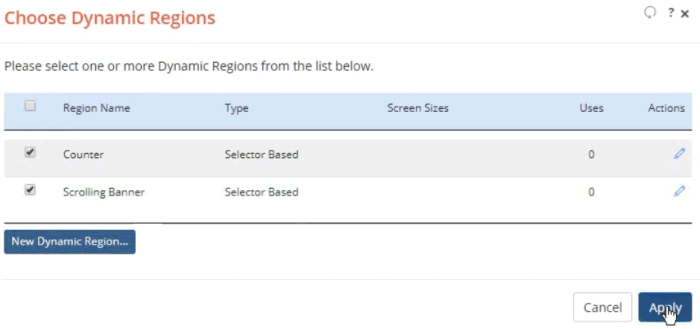
To apply to a select set of pages, open your results, multiply-select the desired pages, and then choose the 'Apply Dynamic Region' menu option from the 'More Actions' menu.
In the Choose Dynamic Regions Dialog, simply check one or more Dynamic regions, then click the Apply button.
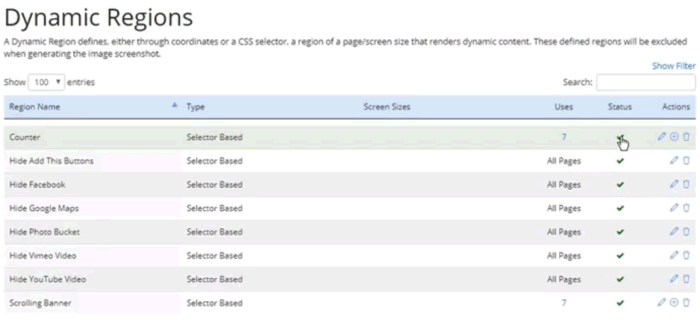
To See and manage all of the Dynamic Regions for the site. Click the Site Settings gear icon on the left side menu, then choose the 'Dynamic Regions' menu item.
A listing page will be displayed that shows all of the dynamic regions, their type, the screen sizes they apply to, and their usage count.
Like in other listing pages, you can toggle an item's state from active to inactive by clicking the green check mark in the Status column. Note that any inactive Dynamic Regions will not be applied when capturing or comparing pages.
OK, that's it. Those are the two types of Dynamic Regions that can be applied to mitigate dynamic, interactive or randomized content.
Thanks for watching this video on Website Upgrade tester.com. Be sure to check out our other videos for more detailed information.
---
WebsiteUpgradeTester.com is the only cloud-based, automated, visual testing tool designed to help you efficiently and affordably test your website upgrade. Whether it's a major version upgrade, service pack or security patch, you can quickly test your entire site, no matter how large, to uncover any lurking issues due to the upgrade.
Don't waste time manually testing your next Website upgrade. Visit WebsiteUpgradeTester.com and sign up for a free trial.
For more detailed information about best practices on upgrading your website and improving your website maintenance processes, we recommend reading The Ultimate Guide to Upgrading and Patching Your Website.
Featured Blog Posts

The Ultimate Guide to Upgrading and Patching Your Website
In this Ultimate Guide to Upgrading and Patching Your Website, we’ll walk you through all of the terms, concepts, ideas, and best practices around upgrading a medium to large scale website. We’ll impart our experiences of helping customers perform and test their website upgrades over the past 20 years, so that you can upgrade faster, more efficiently, more often and with better results. Read More


CASE STUDY: How Global Manufacturer ESAB Saved Time, $ and Headaches with their Website Upgrade
ESAB leveraged a new cloud-based visual testing tool designed specifically for website upgrades to automate and streamline their testing efforts. Using the tool saved an estimated three weeks of manual testing time, increased accuracy significantly, and gave the team peace of mind that there were no lurking surprises. Read More