Specifying Pages to Test with Page Sets

Yesterday we posted this new video tutorial that walks you through creating and managing Page Sets.
Think of Page Sets as the way you tell the WebsiteUpgradeTester.com tool what pages to test in your site. A Page Set is simply a listing of URLs. You can have one list of all pages or multiple lists of various pages of your site. What works best is up to you.
The WebsiteUpgradeTester.com tool gives you four (4) options for specifying a Page Set. You can import a list of URLs from a CSV spreadsheet file, have the tool spider your site, read in a list of URLs from your sitemap XML file, or you can enter the URLs manually.
Whichever way you choose, the WebsiteUpgradeTester.com tool will then use this set of pages as the list of URLs to capture.
Video Transcript
Welcome to Website Upgrade Tester.com, the new cloud-based tool that helps you test any upgrade, service pack or security patch to your website.
In this short video, I’m going to walk you through how to create and manage “Page Sets”.
Page Sets are simply the list of pages on your website that you want the tool to test and certain properties for those pages.
You can test all of your site’s pages or a subset. It’s up to you.
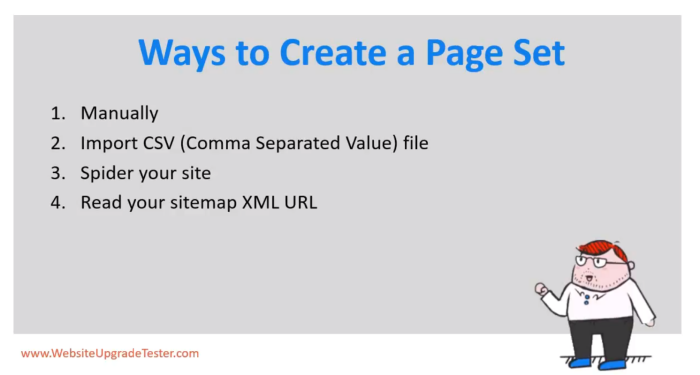
There are 4 ways to create a Page Set.
- Manually adding URLs
- Importing a comma separated value CSV file
- Having the tool spider your site
- Or import the pages specified by your sitemap.xml URL
Then once you initially create the Page Set you can:
- add additional URLs,
- delete any page that has not been previously captured,
- or exclude pages from being processed or reported on.
- Update any pages properties
Since you probably won’t be adding all of your pages manually, let’s show you how to create a Page Set using each of the last three methods, and then how to manage your Page Set Members.
To create a new Page Set, simply click on the Page Set icon in the left-side menu. Then click the blue ‘New Page Set’ button
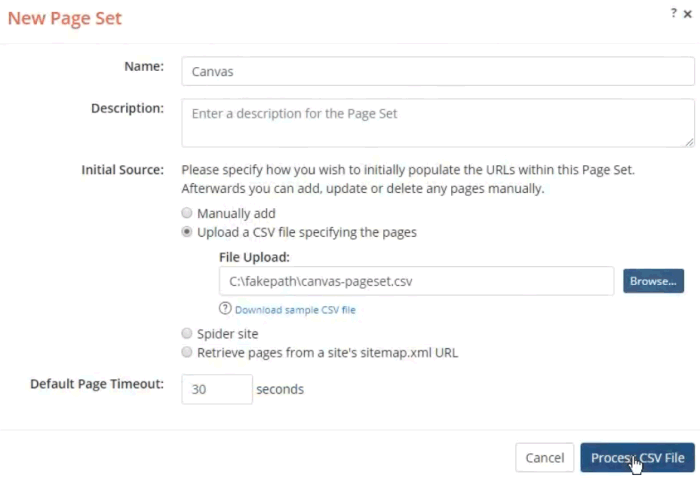
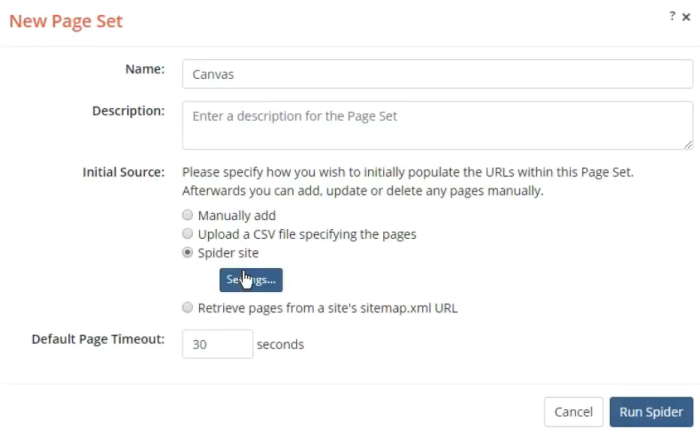
First, give the Page Set a name and an optional description.
Then pick the initial source and specify a default timeout.
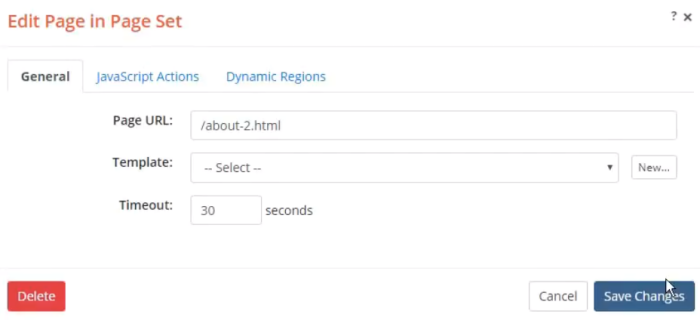
The default timeout specifies how long to the tool should wait for the page to render before considering it an error.
Create Page Set From CSV
To create the Page Set from a CSV file, click the second radio button option.
You will need to have prepared a spreadsheet, saved in CSV format, of the pages you want to test.
Often you can export a URL list from your Content Management System.
You can download a sample CSV file by clicking the link below the Browse input control. Opening it will show the four possible fields you can pass.
- URL
- Template Name
- JavaScript Action
- Dynamic Region
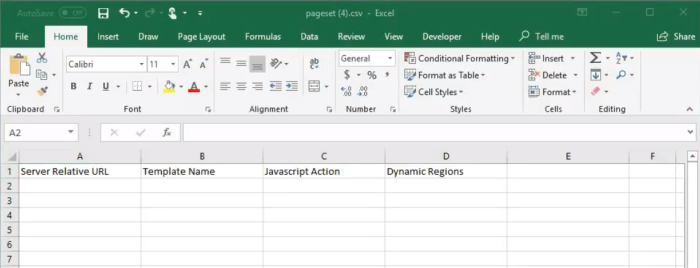
Only the first field URL is required.
Once you choose the CSV from your local filesystem, click the “Process CSV File” button.
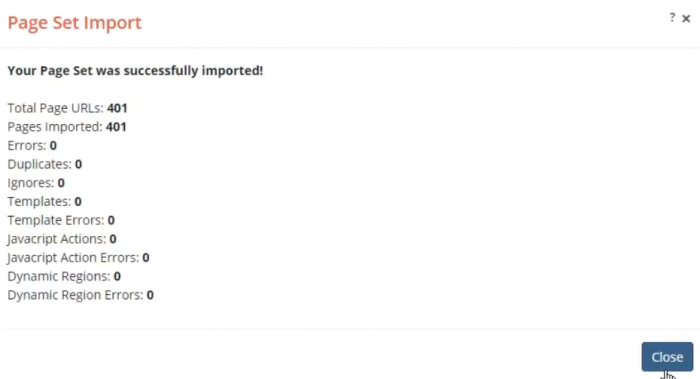
This will begin processing the CSV and show you the status as it progresses.
Create Page Set From Spider
To create a Page Set by spidering your site, choose the third radio button option,
then click the Settings button.
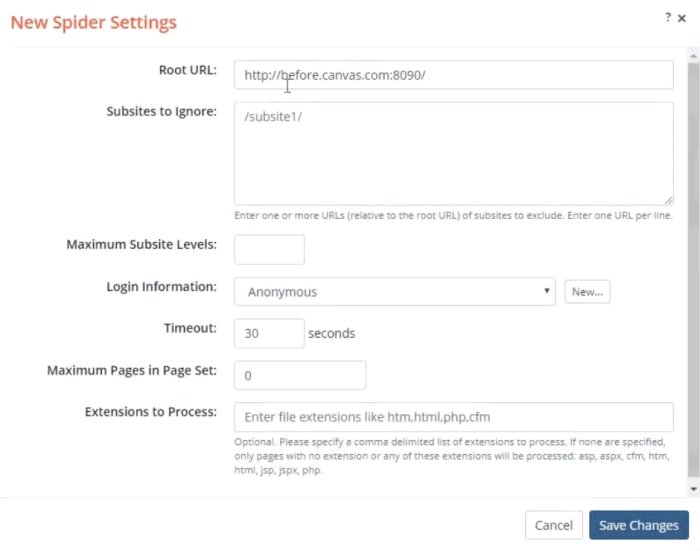
Here you will provide the Root URL to your site with the option of providing relative URLs of subsites you do NOT want to Spider.
Then specify how many subsite levels to traverse down, and If there is content that requires authentication you can use a login already saved or create a new one.
The default timeout is 30 seconds, but if you have pages that may take longer, this may be adjusted.
For testing or to keep your page counts low, you can tell the Spider the Maximum number of pages to create in the Page Set.
And lastly, different platforms have different page types, so if want to only include certain extensions you may enter a comma-delimited list here. All common extensions are included by default.
Save your changes, and then click the “Run Spider” button to start spidering.
The spider run will begin processing and you will begin to see its results.
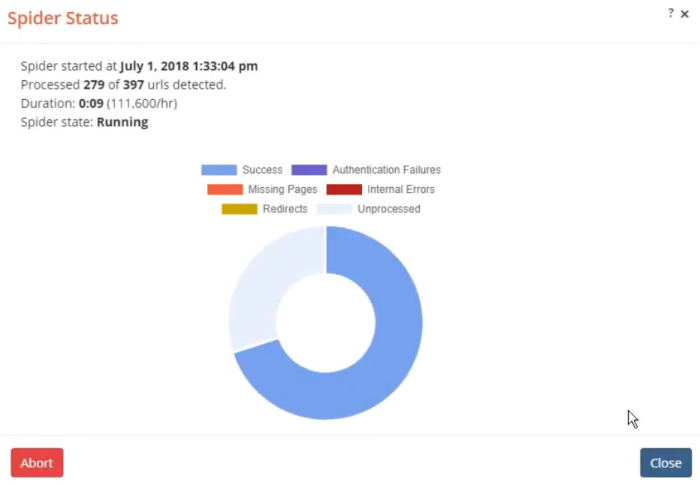
Depending on the size of your site and the number of pages you set as the maximum, it may take some time.
The last option for creating a Page Set is to have the tool read it from your sitemap.xml URL, which already contains a listing of your site’s pages to help search engines like Google know what pages to index.
Click the last radio button to choose this option.
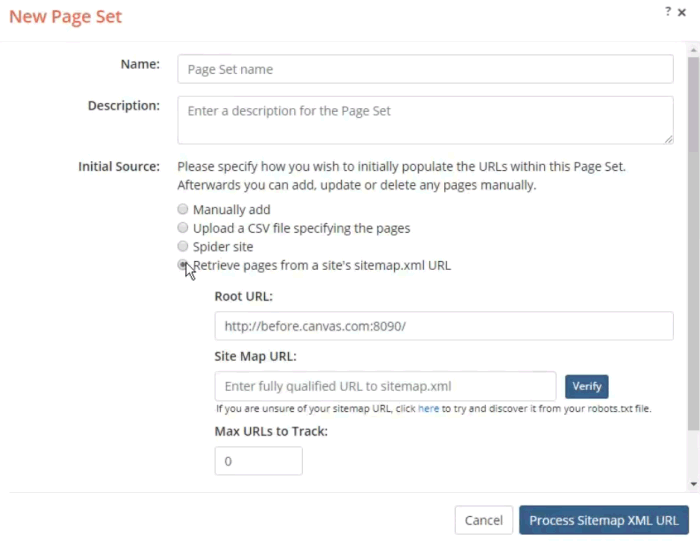
Enter the fully qualified URL to the root of your site, and then to your sitemap xml file. Then click the Verify button.
Provided that the URL you specified points to a valid sitemap file, the validation should return successfully.
Ok, that verified.
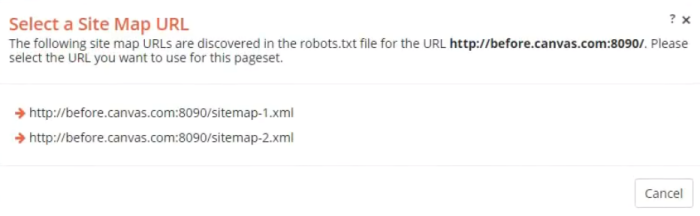
If you are not sure of your sitemap URL, click the link below to try and discover it from your robots.txt file.
Our robots.txt file references two sitemap xml files, so I’ll need to choose which one to use. If your robots.txt file only referenced one, then it would be copied into the input control automatically.
Similar to the spider settings, you can limit the maximum number of URLs to add. Zero means unlimited.
When all required fields have been filled, click the “Process Sitemap XML URL” button.
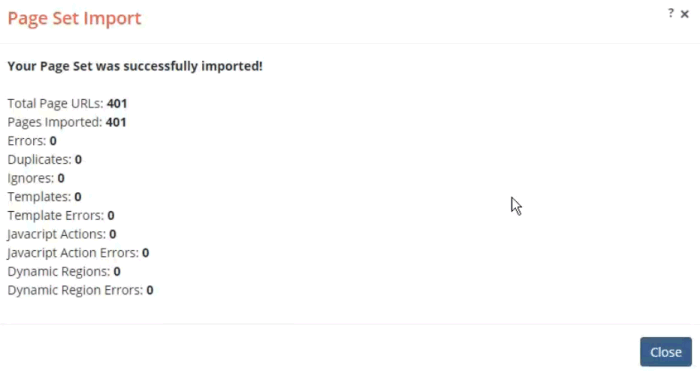
Depending on the size of the file, it should complete quite quickly.
Manage Page Set members
After creating a Page Set from either of the 4 ways, you will see a new row on the Page Sets page for your Page Set. You can access this page and manage your Page Sets by simply clicking the Page Set icon in the Left Side Menu.
Here you will be presented with a listing of your Page Sets. You can have one, or as many as you like.
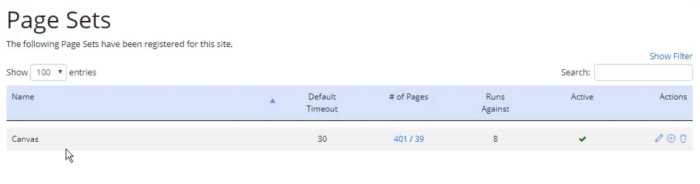
As you can see here, our Canvas demo site has over 400 pages, with 39 excluded.
You can Edit the properties by clicking the pencil icon, Add a new page manually by clicking the plus icon or delete the Page Set by clicking the trash-can icon.
To see and manage the Page Set Members, simply click the count.
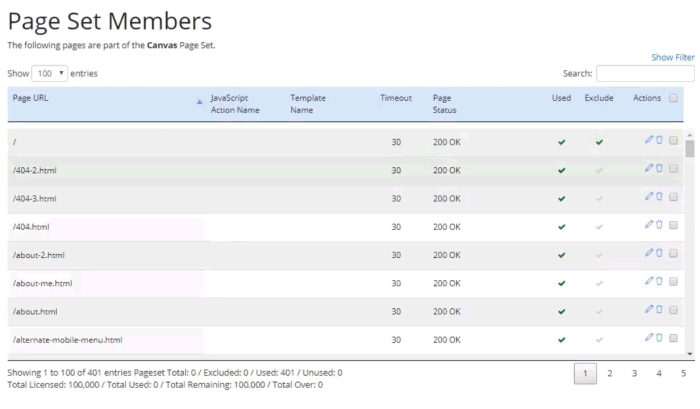
On the Page Set Members page, you will have access to all of the members. If you have lots, they might be split across multiple pages.
You can adjust how many see per page, filter the results using any of the filter bar options, or search for specific pages.
Pages that have runs against them, will be marked ‘used’ with a green check. These pages cannot be deleted but can be marked as Excluded. Excluded pages will not be processed in any runs or shown in any reports.
You can edit the Properties of any page by clicking the pencil icon,
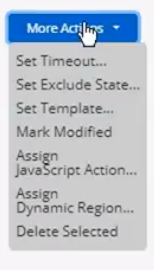
and can multiply select pages and apply any of the actions in the “More Actions” menu.
If you modify any of the properties of a page, you will see that page displayed in Bold in on either the Baseline Results or Comparison Results pages. This will help you know that the page may need to be re-run.
There you have it. You now know all about Page Sets and how to create and manage them.
Thanks for watching this video on WebsiteUpgradeTester.com. Be sure to check out our videos on other topics.
---
WebsiteUpgradeTester.com is the only cloud-based, automated visual testing tool designed to help you efficiently and affordably test your website upgrade. Whether it’s a major version upgrade, service pack or security patch, you can quickly test your entire site, no matter how large, to uncover any lurking issues due to the upgrade.
Don't waste time manually testing your next Website upgrade. Visit WebsiteUpgradeTester.com and sign up for a free trial.
For more detailed information about best practices on upgrading your website and improving your website maintenance processes, we recommend reading The Ultimate Guide to Upgrading and Patching Your Website.
Featured Blog Posts

The Ultimate Guide to Upgrading and Patching Your Website
In this Ultimate Guide to Upgrading and Patching Your Website, we’ll walk you through all of the terms, concepts, ideas, and best practices around upgrading a medium to large scale website. We’ll impart our experiences of helping customers perform and test their website upgrades over the past 20 years, so that you can upgrade faster, more efficiently, more often and with better results. Read More


CASE STUDY: How Global Manufacturer ESAB Saved Time, $ and Headaches with their Website Upgrade
ESAB leveraged a new cloud-based visual testing tool designed specifically for website upgrades to automate and streamline their testing efforts. Using the tool saved an estimated three weeks of manual testing time, increased accuracy significantly, and gave the team peace of mind that there were no lurking surprises. Read More