Step-By-Step Wizard to Test your Website Upgrade

Today we just released another video into our ever-growing set of video tutorials that walks you through using the built-in, step-by-step wizard, within the WebsiteUpgradeTester.com visual testing tool.
If you are struggling with testing your website upgrade in a reasonable amount of time, without burdening your team with hours of manual labor, the WebsiteUpgradetester.com visual testing tool is for you.
This video walks you through how to use its built-in wizard to begin testing your website upgrade.
Enjoy.
Video Transcript
Welcome to Website Upgrade Tester.com, the new cloud-based tool that helps you test any upgrade, service pack or security patch to your website.
In this short video, I'm going to walk you through using the built-in wizard to perform your website upgrade testing.
The website upgrade tester tool comes with a step-by-step wizard that will walk you through the most efficient path to performing your website upgrade. Based on your upgrade environment, and the results along the way, your path may be different. We strongly recommend using this wizard if you are new to the tool. Once you are familiar with the various interfaces and reports, you may choose to work without it, but to start it definitely helps you out.
To access the wizard, simply navigate to the main console page by clicking the Home icon on the left side menu.
I'm on this page now, and you will see that the first pod provides access to the wizard.
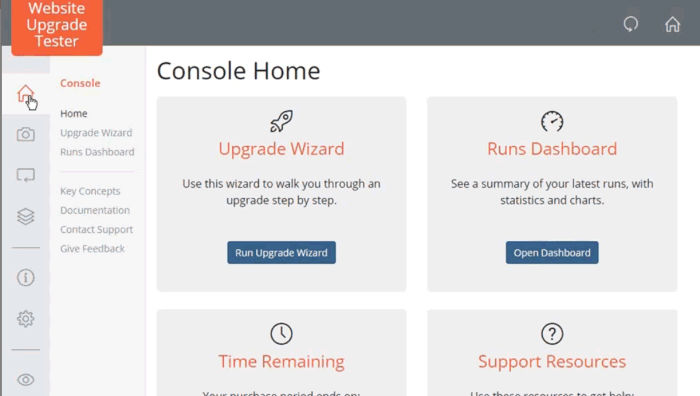
Here I simply click the blue 'Run Upgrade Wizard' button.
Once on the wizard page, the steps that you will perform are displayed in a carousel at the top of the page.
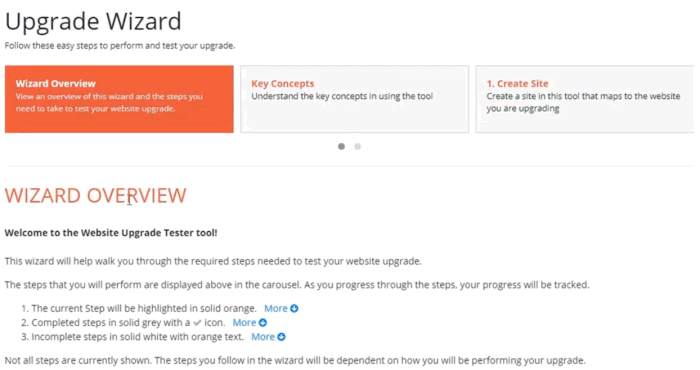
As you move through the steps, your progress will be tracked.
The current step you are on will be highlighted in solid Orange,
Completed steps will appear in solid grey with a checkmark icon,
And Incomplete steps will be in solid white with orange text
Please Note that NOT all steps are shown initially, as they are dependent on how you will be performing your upgrade. As you progress, additional steps will be added into the top carousel based on what path is most appropriate for your upgrade environment.
Ok, let's get started. I'm not going to walk through each step in this video, just enough for you to see how the wizard works.
This first page just explains what I told you, so we'll click the Go To Next Step button.
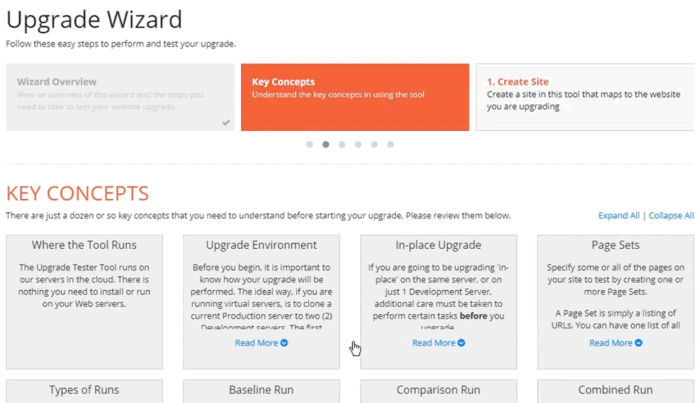
As you can see we progressed to the next step. The carousel at the top now shows we are on the 'Key Concepts' step, highlighted here in orange, and that we completed, the 'Wizard Overview step', which is shown in grey with a check mark.
I can click the Wizard Overview box to go back and see that step.
And I can click on the current step's box, at any time to get back to where I left off.
The 'Key Concepts' step outlines a dozen or so concepts that we think are important for you to understand before you get started.
They also get you familiar with the terminology that we will be using, so I suggest that you read these over before progressing.
You can click the ‘Expand All' link to see all topics or drill into individual ones as needed. You'll see similar Read More links throughout the wizard when more information is available.
Let's click 'Go To Next Step' to continue.
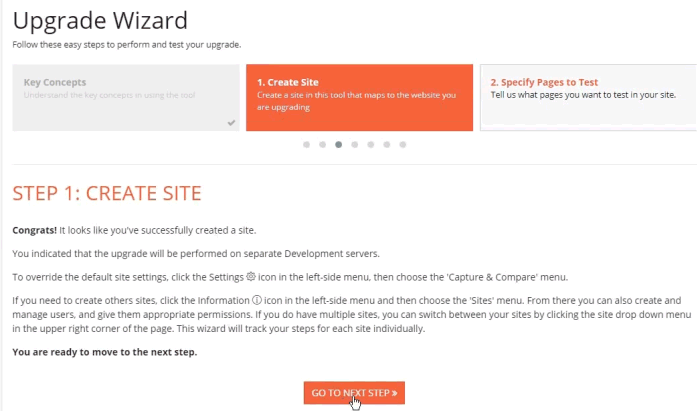
Ok, this is where the real work begins.
You can see that we progressed to the 'Create Site' step.
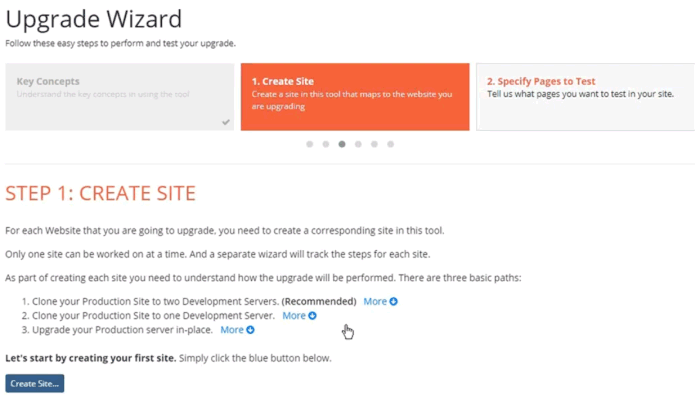
It basically explains that your first step will be to create a site in the tool that corresponds with the site that you are going to test.
If you have multiple sites that you are upgrading, you will need to run through the wizard separately for each site.
As part of creating each site, you need to specify your environment in which you will be performing the upgrade. There are three basic options, which are outlined on the screen.
- Clone your Production Server to two Development Servers and upgrade one of them. This is the recommended environment because it gives you the most flexibility.
- Clone your Production Server to one Development Server.
- Upgrade your Production Server in-place. This is the least recommended option.
After you determine your desired option, click the blue 'Create Site' button.
This will open the New Site dialog, where you will specify the name for your site.
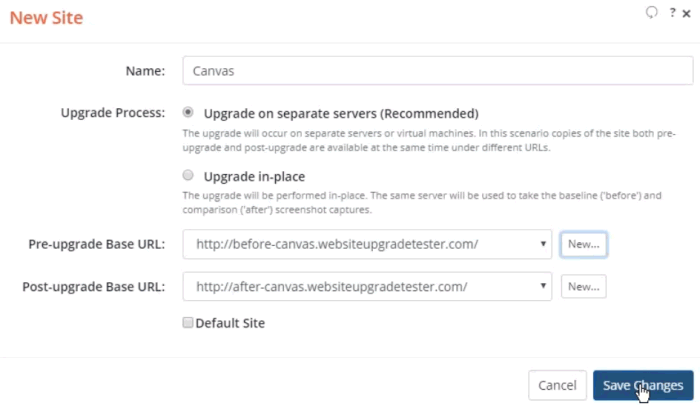
We use our demo site called Canvas, so we'll use that name.
And our upgrade will be performed on separate servers, which covers both options 1 & 2, so I'll select the first radio button.
Next, I need to specify the root URLs to the site on both of the servers - the Pre-Upgrade or 'Before' server and the post-upgrade or 'After' server. Since I have not registered either of these URLs yet, the selection list is empty.
I'll create a new Authorized URL by clicking the New button.
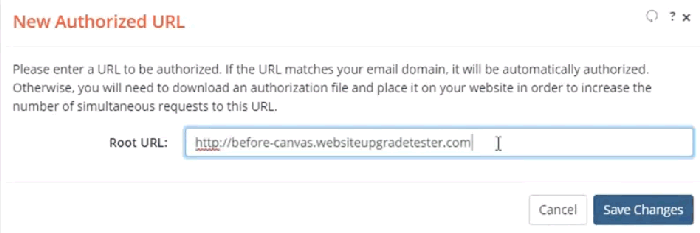
Here I simply type in the fully qualified URL. Note that if the URL does not match the domain of the email address that you used when signing up, you will not be automatically authorized.
If your site is large and you want to test using more than 1 simultaneous request, or if it's behind a firewall, you will need to specify additional settings for these URLs in a separate dialog. We won't cover that here, but check out the video titled 'Authorized URLs, Max Simultaneous Requests and Firewall Settings' for more information.
Ok, let's do the same for the Post-Upgrade Server URL.
Great. That's it. I'll click 'Save Changes'
Ok. You can see now that the site was successfully created.
Let's click 'Go To Next Step' to continue on.
Ok now that we have specified how many servers will be used for testing and we created a site, you'll notice that the wizard steps begin to have numbers. You can grab one of the boxes in the carousel and begin to drag it to the left to reveal the steps. Depending on the upgrade type you chose, the steps may vary.
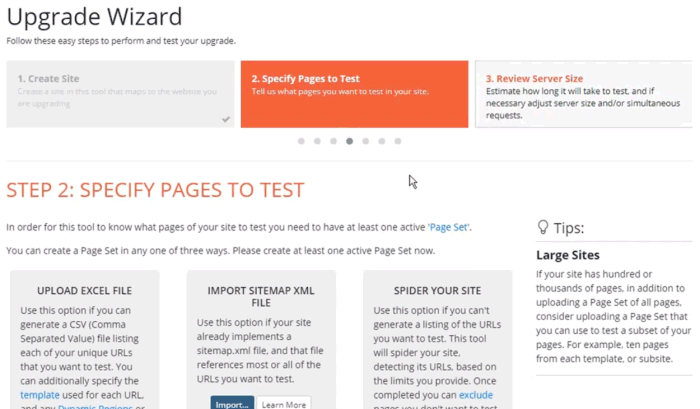
In this next step, you will be creating a Page Set, which defines the pages in your site that you want to test.
This is where we'll stop in this video, as we don't need to show all the steps in the wizard. Hopefully, you have seen how the wizard works, how you progress through each step, and how you can review steps that you have completed.
One important thing to know is that if you need to stop in the middle of the wizard, no problem. You can pick right back up where you left off by going to the Console Home page and this time you will click the blue 'Continue Upgrade Wizard' button.
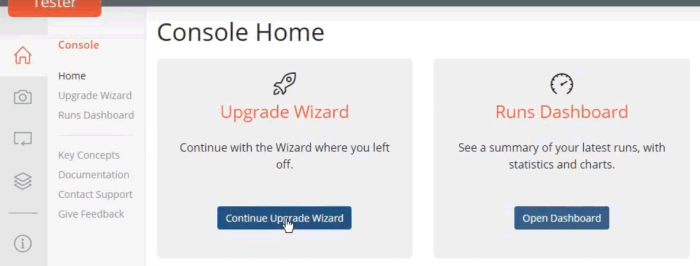
As you can see, it brought me right back to where we had stopped - on the step to 'Specify Pages to Test'.
That's it. Thanks for watching this quick overview video on how to use the built-in Upgrade Tester Wizard. Be sure to check out our other videos on how to improve your upgrade testing, using Website Upgrade Tester.com.
---
WebsiteUpgradeTester.com is the only cloud-based, automated, visual testing tool designed to help you efficiently and affordably test your website upgrade. Whether it's a major version upgrade, service pack or security patch, you can quickly test your entire site, no matter how large, to uncover any lurking issues due to the upgrade.
Don't waste time manually testing your next Website upgrade. Visit WebsiteUpgradeTester.com and sign up for a free trial.
For more detailed information about best practices on upgrading your website and improving your website maintenance processes, we recommend reading The Ultimate Guide to Upgrading and Patching Your Website.
Featured Blog Posts

The Ultimate Guide to Upgrading and Patching Your Website
In this Ultimate Guide to Upgrading and Patching Your Website, we’ll walk you through all of the terms, concepts, ideas, and best practices around upgrading a medium to large scale website. We’ll impart our experiences of helping customers perform and test their website upgrades over the past 20 years, so that you can upgrade faster, more efficiently, more often and with better results. Read More


CASE STUDY: How Global Manufacturer ESAB Saved Time, $ and Headaches with their Website Upgrade
ESAB leveraged a new cloud-based visual testing tool designed specifically for website upgrades to automate and streamline their testing efforts. Using the tool saved an estimated three weeks of manual testing time, increased accuracy significantly, and gave the team peace of mind that there were no lurking surprises. Read More